Will output optimal graduation mark based on current students, phi, and tau values. Instructions on how to run are found in Introduction to Graduation.
Leaderboards for highest τ and publication multi of each theory, highest positive and negative ρ of each lemma, highest overall and minigame stars, and a monthly updated cross platform F(t) rankings.
Get confused with all the variables in T1-T8, MF, BaP, FP, and TC? Get tired in calculating the ratio of to other variables? Tired of checking the sim for purchasing variable? Here introduce a convenient tool to instantly check which variables to buy next! All u need is the levels of the variables at the current stage, and it will calculate automatically for u! Made by Hackzzzzzz.
Get lost which theory you should push next for T1-8 and the CTs? Use the Next Theory to Push Calculator to help you decide. Originally made by d4Nf6Bg5.
Centralized sheet with all currently finished and in-development Custom Theories. All future official Custom Theories will be on this sheet before they become official. Message @a_spiralist or @jooo_1265 on the Exponential Idle Discord for updating, fixing, and general sheet editing.
If you want to track your daily tau gains and contribute to daily tau rates graphs, request for access on this sheet. F(t) and Tau graphs available.
Dawn of the first day. Last night, did you dream good?
Today we will be looking at an example of a custom theory, in order to see how one can be constructed. We will send a theory through the SDK, then take a look at its source code.
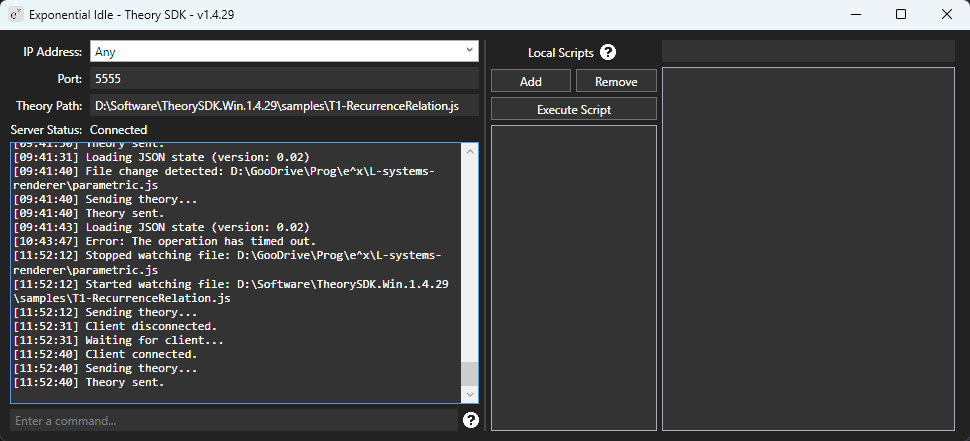
Let’s first learn how to send a file to your device through the SDK. Open the SDK, and then click on Theory Path to select a file to send. Choose CustomTheory.js right from the SDK’s root folder.
Now, connect your phone to the SDK. In order to do so, connect your working environment (computer with SDK) and your gaming device (phone) to the same network, and then you need to know the IP address of that mutual network. To do so, first enter your command line interface:
Windows: Right click the Start button, select Terminal.
Linux: For Chromebook users, follow this tutorial. Otherwise I think you’re nerdy enough to know this.
Mac: Click the Launchpad, search for Terminal.
For Visual Studio Code users, press Ctrl+Shift+` to bring up a terminal.
Your command line interface has a command to show connected networks:
ipconfig for Windows & newer Linux versions, or
ifconfig for Mac & Linux.
Find the aforementioned mutual network, which may show up with a name similar to Wireless LAN adapter Wi-Fi, and note the IPv4 address. If you’re using an emulator such as Bluestacks, there may be a different network that you need to connect to (in my case, it is called Ethernet adapter vEthernet (BluestacksNxt)). Note that the emulator’s IP address may change every time it is started, or when your computer is rebooted.
In-game, access the custom theory panel using the bottom arrows, until you reach a screen saying Tap to select a custom theory. Enter the menu, press the SDK button. Write the IPv4 address into your gaming device, while the address in the SDK can be left as Any, unless you’re a masochist.
Then tap Connect to SDK. The SDK will begin sending the first file to your phone, which will show up in-game as My Custom Theory. Try it out for a few minutes. Subsequently, whenever you edit and save that file in a code editor, the SDK will resend it automatically to the connected device.
Now, let’s dissect the file, section by section. If there’s anything you do not understand, feel free to skim through.
First, we see five lines of import statements. Remember how yesterday, I told you that modules were not supported by the game’s JavaScript interpreter? This means that we will not be able to separate our theory into multiple source files for easy keeping. So why import at all? The answer is, there is actually one incentive to keep importing the things you need from the custom theory API: it is for the syntax highlighting and auto-completion features of your editor (if available). Your editor may even automatically import things for you.
Next is the information section. Here we see four important variables: id, name, description, and authors (as well as version and releaseOrder, which are only used for officially adding a theory into the game):
id: The theory’s identifier. Must be unique from other theories on the web. The game keeps track of theories’ IDs in order to store their data.
name: The theory’s name.
description: A description of what the theory is about.
authors: The person/people who made this theory.
This information can be viewed by pressing the cog button in the theory selection menu. As these variables are referenced by the game outside the theory’s scope, they must be declared with var, instead of let or const. The same is true for almost all of the functions we will be discussing below.
After a few other variable declarations, we see our first function: init. While this is technically not a function required by the game (which means you can also use let or const for this), it is a bundling of mandatory declarations: upgrades, permanent upgrades, milestones, achievements, and story chapters. init is called once at the end of the file.
This is the first place where we encounter what’s known as an arrow function: var init = () => {…;}. They are mentioned in Section 8 of the JavaScript tutorial, and aside from a few differences, they’re mostly identical to normal functions covered in Section 5. An arrow function’s arguments are specified in parentheses like normal functions, while the function body is written inside the code block after the arrow.
At the beginning of the function’s body, we see a currency being defined using theory.createCurrency. The currency takes the default symbol of the Greek letter rho ().
Then, within the Regular Upgrade section, we see two upgrades, each declared in a code block: c1 () and c2 (). They are declared using the function theory.createUpgrade.
Next, Permanent Upgrades are defined. There are 3 functions provided to create upgrades for Publications, Buy All, and Auto-buyer, but you can also create your own permanent upgrades using theory.createPermanentUpgrade.
In the Milestone Upgrades section, the milestone cost is defined using theory.setMilestoneCost, and then there are 2 milestones being defined using theory.createMilestoneUpgrade: c1Exp and c2Exp.
Next, 2 Achievements and 2 Story chapters are defined. They are, most of the time, pretty easy to set up compared to the upgrades and milestones.
Finally, updateAvailability is called. You can see that it is called before it is actually defined below. This is a concept known as hoisting, covered in Section 17 of the JavaScript tutorial. updateAvailability is also a required function, as it is often used to display and hide upgrades depending on player’s progression or other conditions. It needs to be defined as a var so the game can access it within init.
The next function, tick, is where everything important happens. Terms get recalculated, currencies increase, bins get repacked, and reactors scream. Ten times a second, this function is called by the game, with two arguments:
elapsedTime: elapsed time, in seconds. When in-game, it is most often 0.1, and occasionally 0.2 or more if the processing couldn’t catch up with the previous tick. When offline, this argument can be of any value depending on your offline time and the offline accel button.
multiplier: usually 1, this argument becomes 1.5 when the ad boost is active.
The primary (upper) equation, through getPrimaryEquation. It needs to be refreshed manually every time you want to reflect a change (e.g. new milestone or term unlocked), using theory.invalidatePrimaryEquation.
The secondary (middle) equation, through getSecondaryEquation. It needs to be refreshed manually using theory.invalidateSecondaryEquation.
The publication formula, through getPublicationMultiplierFormula.
When we look at the secondary equation or the publication formula, we can see that the functions don’t actually have a code block attached:
var getSecondaryEquation = () => theory.latexSymbol + "=\\max\\rho";
var getPublicationMultiplierFormula = (symbol) => "\\frac{ {" + symbol + "}^{0.164} }{3}";
Instead, they exist on only one line. This indicates that the functions immediately return the following expression, and this code is the short-hand equivalent of:
var getSecondaryEquation = () =>
{
    return theory.latexSymbol + "=\\max\\rho";
}
var getPublicationMultiplierFormula = (symbol) =>
{
    return "\\frac{ {" + symbol + "}^{0.164} }{3}";
}
Also note that compared to regular LaTeX, the LaTeX commands in-game must be started with two back slashes, instead of one.
The publication multiplier is determined by getPublicationMultiplier, which takes the tau value (of the last publication) and returns the multiplier as a BigNumber - the game’s large number (‘ee’ and up) library.
The tau value is determined by getTau, based on the currency value. As a high-score metric, tau can only increase and never decrease, unless the theory is reset.
The theory, like most, features a 2D graph displaying the currency’s value on a logarithmic scale. The graph’s value is updated 10 times per second through get2DGraphValue.
Now that you’ve gone through the sample custom theory, you now know roughly how one is structured, even if it’s only a simple one. Perhaps your theory could involve even wilder ideas. I can’t dictate your thoughts, I can only give you the tools to help you do it. And the very first tool you were given: observation. I shall see you tomorrow, where we will take part in your first creation.