

There is no theory 9 guide and this is a guide for what to do after theory 9. Have fun figuring out T9 for yourself and remove students when finished and put back into R9 and
Theory 9 to Endgame
The World of Grinding, R9 Boost, and Custom Theories
Guide written by LE★Baldy and Snaeky. Contributions from the Amazing Community.
This guide is currently undergoing change. Keep in mind, strategies may change.
Feel free to use the glossary or Eylanding's simplified T9 & Endgame guide as needed.
DO T9 IMMEDIATELY TO UNLOCK CUSTOM THEORIES
▶︎ Theory 9 Permalink: theory-9#
▶︎ Graduation routing Permalink: graduation-routing#
Routing is based on your current Tau (
Make sure to use the for optimal graduation, student, star, and theory options.
▶︎ Push F(t) with 3R9 swapping Permalink: push-ft-with-3r9-swapping#
Memorize your student distributions with and without 30 R9 students. Use the student calculator if needed. You will commonly see people refer to this as R9 swapping as a long held name of the strategy.
- Wait till
stops growing with students in R9 pushing . - Start accel (preferably keep it between prestiges).
- Potentially sit here to stack t for bigger
when you have students in . Only do this when you are near a graduation mark. - Respec all 30 students from R9.
- Wait for the autoprestige to prestige and swap back students to R9.
- Repeat.
Also see t stacking
▶︎ R9 autoprestige expression Permalink: r9-autoprestige-expression#
You can find the autoprestige used for R9 Swapping here: Equation. If you don’t have this expression, then you will have to manually prestige each time (turn it off before swapping).
Reference R9 Swapping Autoprestige Explanation
▶︎ How to properly use the Graduation Calculator Permalink: how-to-properly-use-the-graduation-calculator#
The graduation calculator is a great tool to be able to get the best
▶︎ Three Steps To Getting The Best Result Permalink: three-steps-to-getting-the-best-result#
- After your progress has slowed after recovering from a graduation and nearing the next graduation, get results from the calculator. Only the
output here is useful. - Upon arriving to the most recent output, get a new set of results from the calculator.
- Repeat Step 2 until output is the same
you are currently at. This is when you should graduate.
Note: You may run into a Tau is higher than Phi result, or similar to this, but this is due to data running that portion of the calculator being old and before Custom Theories were introduced which shifted the relative amounts. This will be fixed in the future with more data (submit here after any graduation).
▶︎ Theory routing and strategies Permalink: theory-routing-and-strategies#
For best theory routing and pushing, use the Theory Sim and the Theory Sim Guide to give the best strategy and multiplier for the next publications. Human T5 explanation is put below as well.
Reminder: Do T9 right upon unlocking it, reaching ee20k. This will unlock Custom Theories significantly improving progress.
▶︎ Theory Rate Graphs Permalink: theory-rate-graphs#
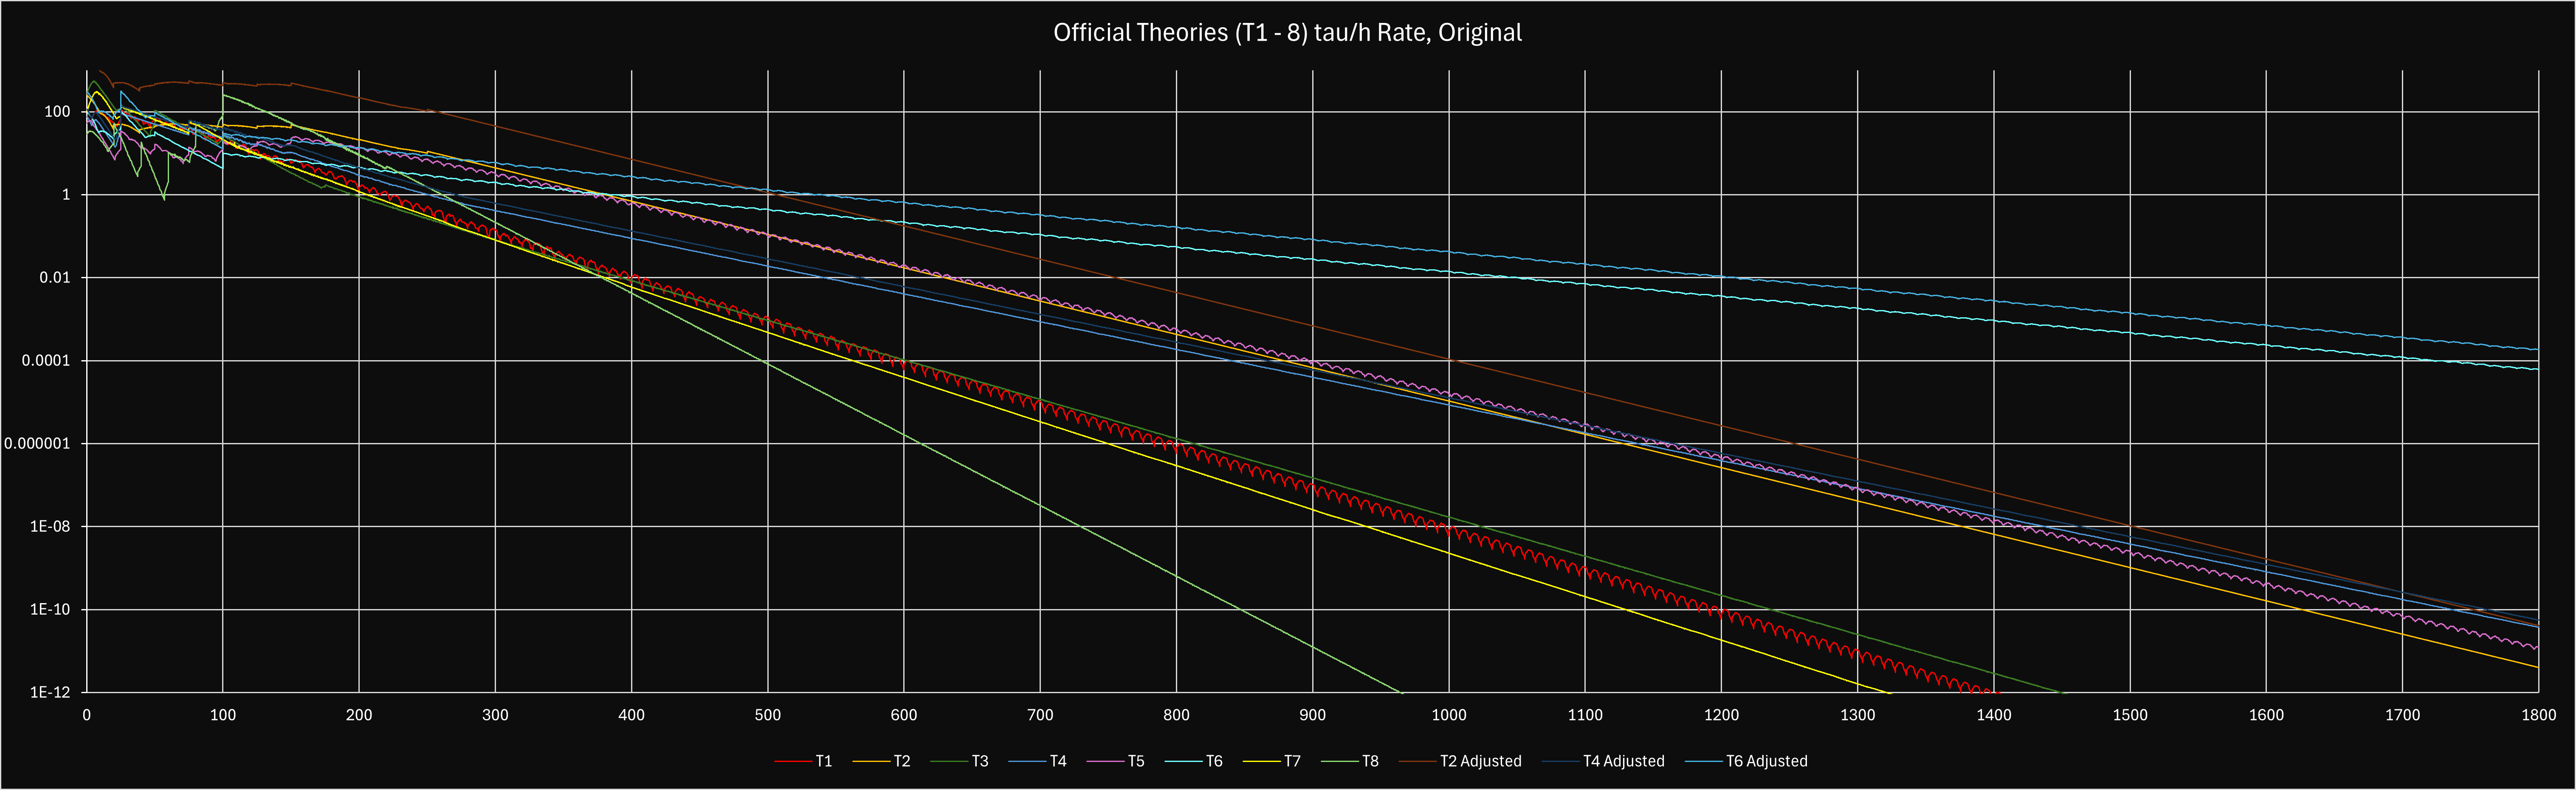
| T1-8 Active |
![T1-8 Active Rate vs. τ adjusted for 345 students [F(t)=ee70k]](/images/theory-rates/ot_rate_active_adjusted_graph.png)
| LATEXDOLLAR |
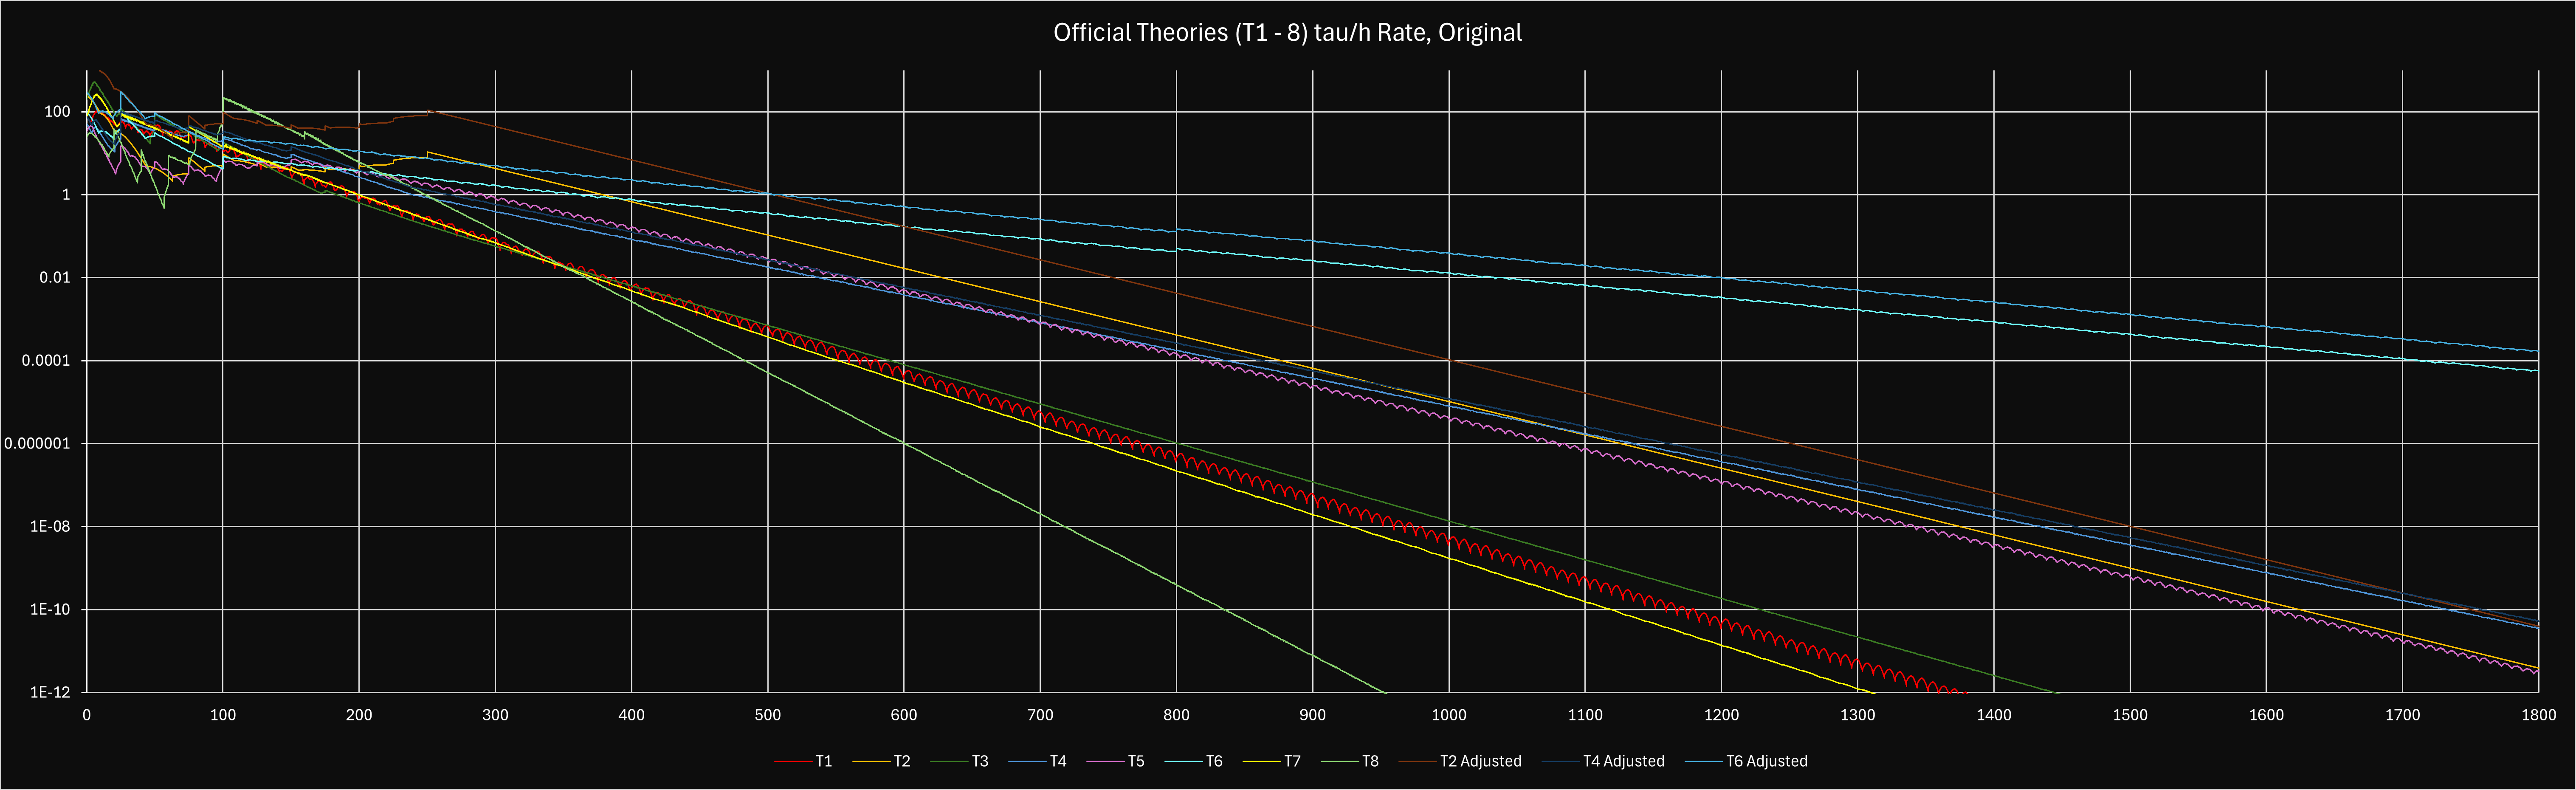
| T1-8 Idle |
![T1-8 Idle Rate vs. τ adjusted for 345 students [F(t)=ee70k]](/images/theory-rates/ot_rate_idle_adjusted_graph.png)
| LATEXDOLLAR |
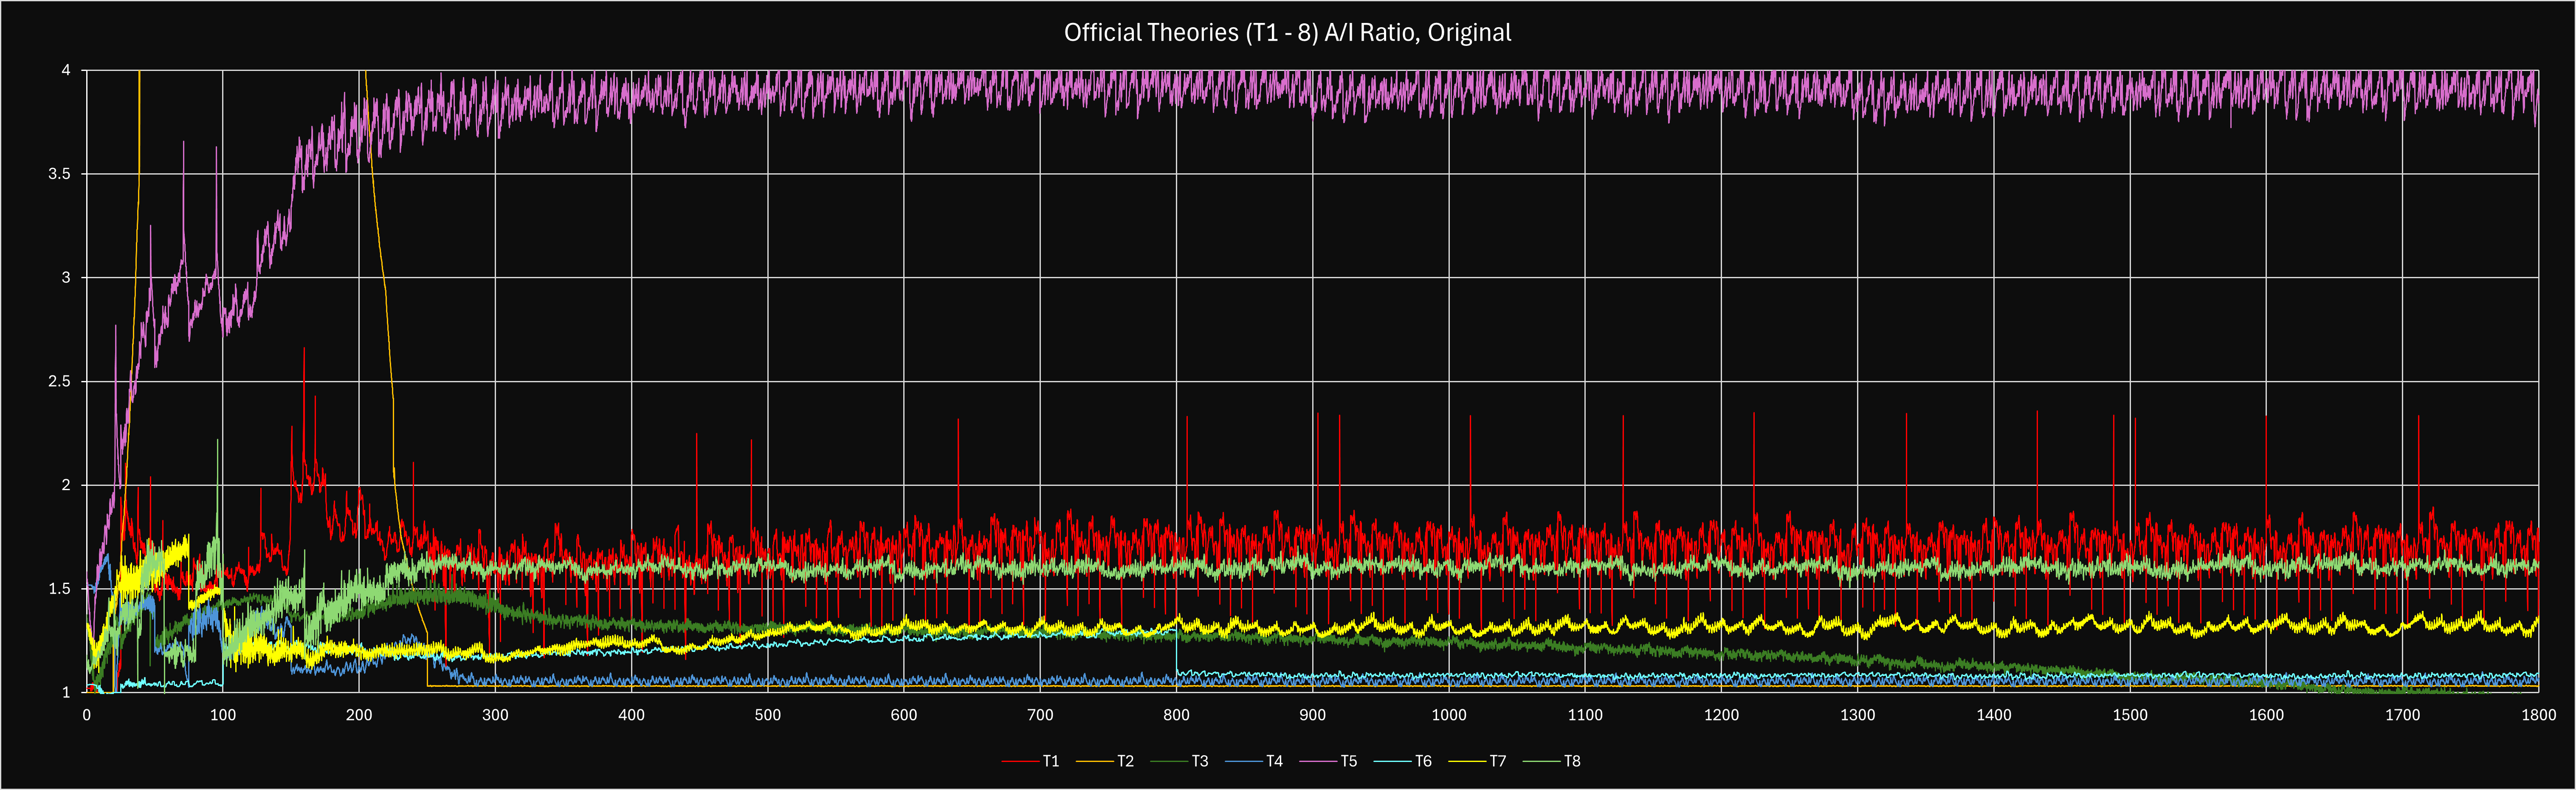
| T1-8 Active/Idle |
Graphs made by Hackzzzzzz
▶︎ T5 routing Permalink: t5-routing#
Running the active strats will make this the number one theory for a while and eventual number two after T6 takes over (e750-770+). A step-by-step on how to progress the theory is below.
Steps Created by: Snaeky, Marks, Baldy, and Nerdy
- x10 buy
manually and autobuy the rest until within ~ of your previous publication. - Around your last pub mark within ~
, start autobuying and stop autobuying and . At this point: - buy
up to of the cost of the next doubling purchase ( purchase), - and buy
after you purchase up to lower than . This limit will increase as you get higher and further into a publication.
- buy
- Once you reach the desired publication point, publish.
- Repeat this for stonks.
Commentary
No commentary
T5 will always give its best results from active play. However, after step 3, you can still get good results while autobuying
Additional Information Permalink: additional-information#
Purchase
Strategy constructed by: Snaeky, Marks, Baldy, and Nerdy
▶︎ t stacking Permalink: t-stacking#
A useful strategy in the later stages of a graduation is
▶︎ Skipped students routing Permalink: skipped-students-routing#
Once you have enough students to always have R4 to R7 maxed out (about 30k), you will want to look for “Bigmas”, students that will yields a larger than normal amount of
The table below lists out all of the Bigma. Skipmas will not be listed as they are only ever viable if you are at the extreme endgame with very low rates which has not been the case since pre-1.4.21 (January 2022).
Note: The best way to decide a bigma skipma is to either calculate
| Students | |
|---|---|
| 148, 151, 154, 157, 160, 163 | 30.6k, 31.2k, 31.8k, 32.4k, 33.0k, 33.6k |
| 167, 171, 175, 179, 183, 187 | 34.4k, 35.2k, 36.0k, 36.8k, 37.6k, 38.4k |
| 192, 197, 202, 207, 212, 217 | 39.4k, 40.4k, 41.4k, 42.4k, 43.4k, 44.4k |
| 223, 229, 235, 241, 247, 253 | 45.6k, 46.8k, 48.0k, 49.2k, 50.4k, 51.6k |
| 260, 267, 274, 281, 288, 295 | 53.0k, 54.4k, 55.8k, 57.2k, 58.6k, 60.0k |
| 303, 311, 319, 327, 335, 343 | 61.6k, 63.2k, 64.8k, 66.4k, 68.0k, 69.6k |
| 352, 361, 370, 379, 388, 397 | 71.4k, 73.2k, 75.0k, 76.8k, 78.6k, 80.4k |
| 407, 417, 427, 437, 447, 457 | 82.4k, 84.4k, 86.4k, 88.4k, 90.4k, 92.4k |
| 468, 479, 490, 501, 512, 523 | 94.6k, 96.8k, 99.0k, 101.2k, 103.4k, 105.6k |
| 535, 547, 559, 571, 583, 595 | 108.0k, 110.4k, 112.8k, 115.2k, 117.6k, 120.0k |
| 608, 621, 634, 647, 660, 673 | 122.6k, 125.2k, 127.8k, 130.4k, 133.0k, 135.6k |
| Due to fluctuations with stars, accel, | |
Explanation by: Snaeky and AfuroZamurai
Calculations by: LE★Baldy
▶︎ Supremacy Equation Past 48k Permalink: supremacy-equation-past-48k#
When you get to ee48k, you will have all of the
Suprem Equation past ee48k:
(costUpS(1)<e52&&psi+dpsi>e52)
||(costUpS(3)<e411&&psi+dpsi>e411)
||(costUpS(3)<e511&&psi+dpsi>e511)
||(costUpS(3)<e531&&psi+dpsi>e531)
||(costUpS(3)<e551&&psi+dpsi>e551)
||(costUpS(3)<e571&&psi+dpsi>e571)
Suprem Equation past ee52k:
(costUpS(1)<e52&&psi+dpsi>e52)
||(costUpS(3)<e511&&psi+dpsi>e511)
||(costUpS(3)<e571&&psi+dpsi>e571)
Suprem Equation past ee58-60k:
(costUpS(1)<e52&&psi+dpsi>e52)
||(costUpS(3)<e571&&psi+dpsi>e571)
Suprem Equation past ee75k:
costUpS(1)<e52&&psi+dpsi>e52
Reference True/False auto expression evaluation
▶︎ How to respec Permalink: how-to-respec#
See the introduction guide for respecing students and
milestones.
▶︎ Lemma Permalink: lemma#
All Lemma sections already have the - buttons unlocked. This gives back the full price paid into the upgrade. This allows for upgrade swapping or dropping upgrades at the very end to hit the lemma limit early. The amount respeced is based on the x1, x10, x25, x100, xMax in the top right. On the right side, you can see the total levels bought. There is also a free reset top right if a mistake is made.