Theories 1-4
This guide is currently undergoing change. Keep in mind, strategies may change.
Feel free to use the glossary or T1-4 as needed.
Theory basics #
Publications are equivalent to prestiges for
use them. However, the best publication multipliers vary from theory to theory and will
change over time. If you are close to a multiplier you want, turn off autobuyer
and let
before the publication (turn on after you publish). This is known and referenced as “coasting”.
Total
combination of all
Don’t be afraid to skip getting all milestones to work on the next or a
better theory.
Graduation routing #
Remember to follow our routing advice from Introduction to Graduation.
Class: graduation_routing;
last_row: false;
5k | ARROW | 5.2k | ARROW | 5.6k | ARROW | 5.8k | ARROW | 6k |
6k | ARROW | 7k | ARROW | 8k | INVIS | INVIS | INVIS | INVIS |
8k | ARROW | 8.4k | ARROW | 8.6k | ARROW | 8.8k | ARROW | 9k |
Theory 1 (20σ / 5k) #
T1 Overview #
In mathematics, a recurrence relation is an equation that relies on an
initial term and a previous term to change.
We start with the current tick’s term,
obtain the value of the next tick,
equivalent to
that is the initial value of 1. Later when we add the
this is now saying that we are now adding each tick the value of
the previous tick ago with a constant
is the same with the next term
ago and a multiplier
being based on the value of
This theory also has its adjusted tickspeed calculated by
lengthens the normal tick length of
up the theory.
T1 formula #
Initial #
\[ρ_{n+1} = ρ_n + c_1c_2\]
First milestone #
\[ρ_{n+1} = ρ_n + c_1c_2 + c_3ρ_{n-1}^{0.2}\]
Second milestone #
\[ρ_{n+1} = ρ_n + c_1c_2 + c_3ρ_{n-1}^{0.2} + c_4ρ_{n-2}^{0.3}\]
Third milestone #
\[ρ_{n+1} = ρ_n + c_1c_2 \left( 1+\frac{ln(ρ_n)}{100} \right) \\ + c_3ρ_{n-1}^{0.2} + c_4ρ_{n-2}^{0.3}\]
Fourth to Sixth milestone #
\[ρ_{n+1} = ρ_n + c_1^{1.15}c_2 \left( 1+\frac{ln(ρ_n)}{100} \right) \\ + c_3ρ_{n-1}^{0.2} + c_4ρ_{n-2}^{0.3}\]
T1 strategy #
The publication multiplier has no optimal fit, as it fluctuates a lot,
but here is known: 4-6 to start; 3-4 between
publication multiplier oscillates between 2.5 and 5 past
get your first milestone, you can turn off
The active strat follows but only works when you have all milestones
past
influences the rate of change of
soon as you can afford it will slow your progress. Lategame, buying
upgrades immediately will slow you more than the benefit of the upgrade
because
and you have
There are
only used when you are past
Note: If you are not doing the active strat, then simply turn off
The video below is only good for early
T1 milestone route #
Class: milestone_routing;
last_row: false;
0/0/1 | ARROW | 0/0/1/1 | ARROW | 0/1/1/1 |
3/1/1/1 | INVIS | INVIS | INVIS | INVIS |
Class: milestone_routing;
last_row: false;
OR | INVIS | INVIS | INVIS | INVIS | INVIS | INVIS |
3 | ARROW | 4 | ARROW | 2 | ARROW | 1x3 |
Theory 2 (25σ / 6k) #
T2 Overview #
This second theory is focusing on derivatives. Derivatives in
mathematics are the rate of change of the function they are the
derivative of. For the case of
the derivative of
In simpler terms, it works similar to how
of the previous
continuous addition of
These two values of
of
equation of
and
reason why
exponents is that they take time to build up and eventually overtake and
keep increasing
boost.
T2 formula #
Initial #
\[\dot{q_n}=q_{n+1}*dt\] for n=1
\[\dot{r_k}=r_{k+1}*dt\] for k=1
\[\dot{ρ}=q_1r_1\]
First and Second milestones #
\[\dot{q_n}=q_{n+1}*dt\] for n=1, 2, 3
\[\dot{r_k}=r_{k+1}*dt\] for k=1
\[\dot{ρ}=q_1r_1\]
Third and Fourth milestones #
\[\dot{q_n}=q_{n+1}*dt\] for n=1, 2, 3
\[\dot{r_k}=r_{k+1}*dt\] for k=1, 2, 3
\[\dot{ρ}=q_1r_1\]
Fifth to Seventh milestones #
\[\dot{q_n}=q_{n+1}*dt\] for n=1, 2, 3
\[\dot{r_k}=r_{k+1}*dt\] for k=1, 2, 3
\[\dot{ρ}=q_1^{1.15}r_1\]
Eight to Tenth milestones #
\[\dot{q_n}=q_{n+1}*dt\] for n=1, 2, 3
\[\dot{r_k}=r_{k+1}*dt\] for k=1, 2, 3
\[\dot{ρ}=q_1^{1.15}r_1^{1.15}\]
T2 strategy #
The optimal multiplier is pretty high and is not known before
The multipliers for active play (which do use coasting) we know at the moment are:
- is to - is -
For both strategies the milestones are listed in the order X>Y, where X and Y are the milestones as numerically ordered top to bottom in-game, are to be maxed in order from left to right.
Idle #
For the idle strategy, you want to prioritize buying milestone levels of 1>2. If you have more than 4 milestones, you will prioritize
milestone 1>2>3>4. You will want to publish at
about 10-100 multiplier before
If possible, swap to milestones 3>4>1>2 at the end before publishing for an additional boost.
Active #
The goal of the active strategy is to grow
much as possible while being able to take advantage of the exponent
milestones too, yielding a large boost from that growth. The active for T2 is on a 50-second cycle between two milestone sets: 10 seconds for
exponent priority (Milestones 3 and 4) and 40 seconds for derivative priority (Milestones 1 and 2) . You will start a publication with exponent priority as the cost of the variables gained from milestones 1 and 2 are
too large for you to get right away. When you can afford them, you will
start the cycle. The full cycle is listed below:
1-3 Milestones
3>4 (10s) → 1 (40s) → 3>4 (10s) → 2 (40s) →
repeat → coast and publish
4+ Milestones
3>4>1>2 (10s) → 1>2>3>4 (40s) →
3>4>1>2 (10s) → 2>1>3>4 (40s) →
repeat → coast and publish
Past
effective. At
Until you have over
to run idle overnight.
When you get to Theory 3 at ee7k, move on to pushing Theory 3 when active and running T2 overnight. The above is simply an option if you rather not work on T3 now.
T2 milestone route #
Class: milestone_routing;
last_row: false;
2/0/0/0 | ARROW | 2/2/0/0 | ARROW | 2/2/3/0 |
2/2/3/3 | INVIS | INVIS | INVIS | INVIS |
Class: milestone_routing;
last_row: false;
OR | INVIS | INVIS | INVIS | INVIS | INVIS | INVIS |
1 x2 | ARROW | 2 x2 | ARROW | 3 x3 | ARROW | 4 x3 |
Theory 3 (30σ / 7k) #
T3 Overview #
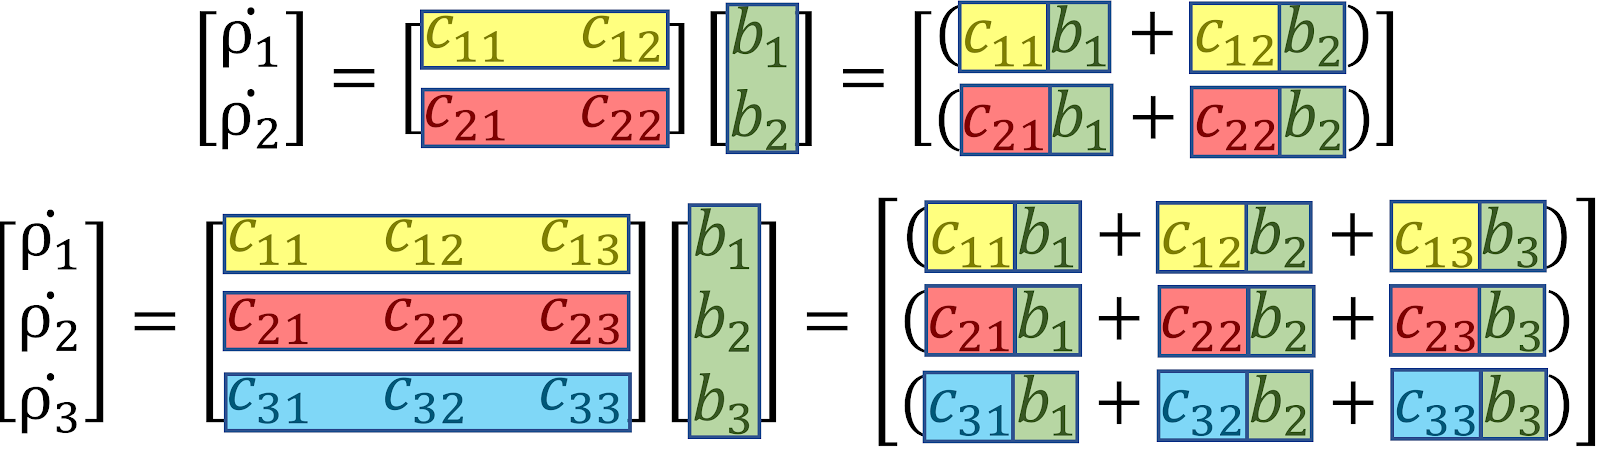
The basis of this theory and understanding how it works is based on
matrix multiplication. The following color-coding helps displays
how matrix multiplication works:
Original Image (April 2021 - May 2025)
This gives the basis for why certain upgrades are more powerful than
others. The exponents on
all directly affect
dimension roughly gives
to the
T3 strategy #
The optimal publication multiplier is about 2-3 without cruising and 3-4
with cruising. If you decide to play actively, there is a form of
exponent swapping strat to be aware of. This is a difficult
strategy because it requires you to notice when a certain threshold
happens. It happens when the following occurs:
\[c_{11}*b_{1}^{1.05\text{ or }1.1}<c_{12}*b_{2}^{1.05\text{ or }1.1}\]
When this happens swap your exponents from
little upgrade boost. It also allows for a slight push of
upgrades to
noticeable. This strategy also works with
not as common.
If you decide to buy manually, the focus areas are buying
e1 lower than
of
swapping strategy described in the previous paragraph, your next focus will be on
for the exponent swap to occur. This leaves the
upgrades at the lowest priority. If you are not using the exponent
swapping strategy from the previous paragraph, then all the remaining
upgrades should be bought at equivalent priority.
At the end of any publication, around a 2-3 multiplier, you should turn
off
3-4 multiplier. Publish and turn back on
repeat.
Commentary
T3 milestone route #
Class: milestone_routing;
last_row: false;
0/2/0 | ARROW | 0/2/2 | ARROW | 1/2/2 |
1/2/2/2 | INVIS | INVIS | INVIS | INVIS |
Class: milestone_routing;
last_row: false;
OR | INVIS | INVIS | INVIS | INVIS | INVIS | INVIS |
2 x2 | ARROW | 3 x2 | ARROW | 1 | ARROW | 4 x2 |
Theory 4 (35σ / 8k) #
Theory 4 Overview #
Theory 4 is based on Polynomials, which contain terms of the form
Theory 4 Equation Description #
The first line states that the rate of change of
The second line is more unique. It says that
For the more mathematically observant reader, we may integrate the
Theory Variable Description #
Approximate variable strengths on
Class: breakdown;
INVIS | Brief Description |
---|---|
[type=“th”;] |
~7% increase on the |
[type=“th”;] |
Doubles the |
[type=“th”;] |
Doubles the |
[type=“th”;] |
Doubles the |
[type=“th”;] |
Doubles the |
[type=“th”;] |
Doubles the |
[type=“th”;] |
~7% increase on |
[type=“th”;] |
Doubles the instantaneous value of |
Theory 4 strategy #
The strengths of each variable are as follows:
Early game (before 14k f(t)):
From 14k f(t) to mid-late game (about e350+ T4):
From e350+ T4 to end game:
Idle #
T4 is quite idle friendly compared to T3 and T1. Here are some simple idle strategies for T4:
Start to e25:
Autobuy
e25 to e175:
Get the ‘Add the term’ milestones. Prioritize these ones first until maximum. Now autobuy
When
e175 to endgame:
Simply autobuy
Semi-Idle #
There’s no strategic difference between semi-idle and idle for this theory. The main difference is with semi-idle, we would publish more often since we check the game more often. We wouldn’t overshoot the optimal multiplier as much.
Active #
T4 active is more involved. However it is not as demanding as T3 or T1 active.
Start to e75:
Autobuy
e75 to e175 OR 14k f(t):
Now here is where we can apply some more advanced strategies. Consider that the
- Do the same strategy as before until we reach our previous publication point.
- Take point(s) out of the
exponent milestones and unlock all the terms (the first milestone). We should now have access to . - Autobuy
, , , . - If you want to optimize a bit more, you can buy
until its cost exceeds about 15% of . Otherwise it’s ok to also autobuy . - DO NOT autobuy
, , . - Publish at ~10-20. Once published, remember to take out the milestone point and put it back into the
exponent to repeat step 1.
If done right, this strategy is significantly faster than the idle strategies above. The logic with this strategy is that the
e175 OR 14k f(t) to ~e300 T4
We will do the exact same strategy as in the #start to
~e300 to endgame
At this point the
T4 milestone route #
Class: milestone_routing;
last_row: false;
3/0/0 | ARROW | 3/0/3 | ARROW | 3/1/3 |
Class: milestone_routing;
last_row: false;
OR | INVIS | INVIS | INVIS | INVIS |
1 x3 | ARROW | 3 x3 | ARROW | 2 |
Theory tier list (Pre-9k+) #
Before you reach 9k, these are the recommended values for each theory.
You may not hit the values and have a different distribution, but work on getting these theories up to these values later. This list is in order of priority.
Class: breakdown;
last_row: false;
INVIS | Approximate |
---|---|
[style=“border-right:$table-border-thin;”;]T2 | |
[style=“border-right:$table-border-thin;”;]T1 | |
[style=“border-right:$table-border-thin;”;]T3 | |
[style=“border-right:$table-border-thin;”;]T4 |