Will output optimal graduation mark based on current students, phi, and tau values. Instructions on how to run are found in Introduction to Graduation.
Leaderboards for highest τ and publication multi of each theory, highest positive and negative ρ of each lemma, highest overall and minigame stars, and a monthly updated cross platform F(t) rankings.
Get confused with all the variables in T1-T8, MF, BaP, FP, and TC? Get tired in calculating the ratio of to other variables? Tired of checking the sim for purchasing variable? Here introduce a convenient tool to instantly check which variables to buy next! All u need is the levels of the variables at the current stage, and it will calculate automatically for u! Made by Hackzzzzzz.
Get lost which theory you should push next for T1-8 and the CTs? Use the Next Theory to Push Calculator to help you decide. Originally made by d4Nf6Bg5.
Centralized sheet with all currently finished and in-development Custom Theories. All future official Custom Theories will be on this sheet before they become official. Message @a_spiralist or @jooo_1265 on the Exponential Idle Discord for updating, fixing, and general sheet editing.
If you want to track your daily tau gains and contribute to daily tau rates graphs, request for access on this sheet. F(t) and Tau graphs available.
The theory sim (simulation) we currently recommend was originally made by XLII, now maintained by the sim team and can be accessed here.
For help on specific (active) strategies, Hackzzzzzz’s Theory Quick Purchase Testers can output when to buy variables. Take a look for help with difficult strategies.
A “%” can be seen in the table of some strategies. The “%” indicates modulus, which to simplify, is the remainder of a division.
So,
13 % 10 = 3
21 % 10 = 1
20 % 10 = 0
Because the modulus used is mod10, and we use a base 10 numbering system, we can look at the last digit of the level to easily find the result of the modulus.
T3 has the most variables of any theory and has benefitted the most from player-created strategies. T3Play2 is currently the best active strategy above e350. T3ρ2C23d is an easier version being 10-15% slower.
T3SNAX is currently the best idle strategy above e200. T3SNAX2 is similar to T3SNAX but is designed to be QoL compatible.
The third/fourth official custom theory, abbreviated EF, was first planned by Snaeky, coded by peanut, and balanced with help by XLII. It was released on May 4, 2022, in the same update as CSR2 and the cap increase.
The third/fourth official custom theory, abbreviated CSR2 or CS2, was created by Solarion. It was released on May 4, 2022, in the same update as Euler’s Formula and the CT cap increase from e100 to e150.
CSR2XL x.xx — VERY Active pre-e500, Active post-e500
The fifth/sixth official custom theory, abbreviated FI, was first planned by Snaeky, coded by Gen, and balanced with help by XLII. It was released on April 1, 2024, in the same update as Fractal Patterns and the CT contribution rate increase by x4.
The fifth/sixth official custom theory, abbreviated FP, was created by XLII. It was released on April 1, 2024, in the same update as Fractional Integration and the CT contribution rate increase by x4.
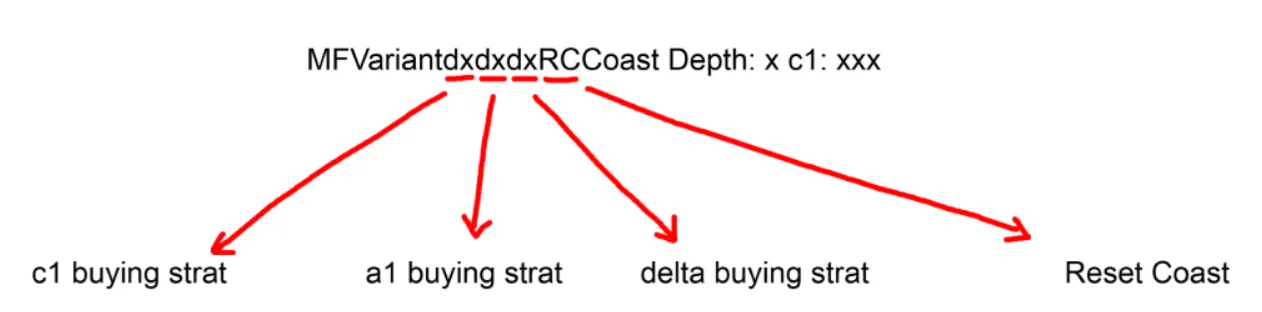
The 8th/9th official custom theory, abbreviated MF, was developed by Mathis. It was released on March 10, 2025 alongside BaP.
The strategies listed here are only variable buying strategies. For resets, please check the sim’s variable buy list (which contains resets highlighted) or the MF guide.
* An earlier version of the strategy did not buy any variables. This is only around 1% slower than the strategy shown above, which does buy and in early parts of the strategy. It’s up to you whether you think that a 1% improvement is worth it or not.
** Coasting Phase
Strategy Credits:
Playspout for creating this strategy.
Solarion for overpush idea.
xelaroc, whose sim was used to verify Playspout’s results
rus9384#1864 for changing phase 3 start from pub mult 1 to pub mult 1.2, and changing phase 4 start from 2 to 2.4
XLII, whose sim was used by rus to test T3Play2 modifications, including the one stated above.
When the theory simulator recommends this strategy, it will show something like: T4C3d: 377 : 252”. The levels it shows after and are the last levels you should buy them in this publication.
If you are confused about the “%”, read about it here.
When the theory simulator recommends this strategy, it will show something like: T4C3coast: 377 : 252”. The levels it shows after and are the last levels you should buy them to in this publication.
IMPORTANT:
Do active buying (buying when isn’t increasing, and x10 for the first few seconds of the publication) for the first few minutes of the publication.
The “xexxx” is returned by the theory simulator. For example, it could say: T1Idle 3e647.
As the publication progresses, buy less (and ).
❌
❌
✔️
If you are confused about the “%”, read about it here.
How does purchasing works exactly?
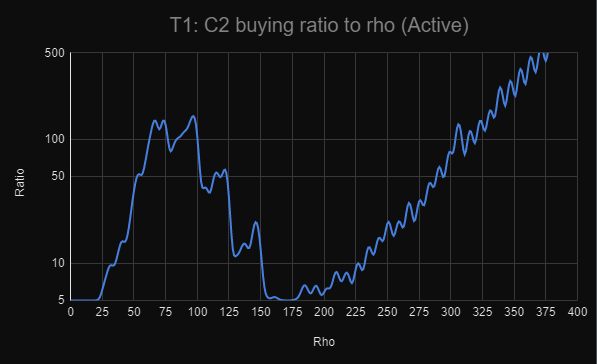
In the sim, the ratio at which is bought to , , is defined as the term ratio between the term and the term, which equates to . If this ratio is 2, then the sim will buy when 2 times cheaper than , , .
Note:
If you need to, you can idle recovery by autobuying and until the theory has passed its previous publication point. This will reduce your rates by only ~1% relative to buying and at e1 ratio the entire publication.
If there is no number after T7PlaySpqcey, then use this table:
T7PlaySpqcey
When cost is of cost
❌
❌
When cost is of cost
When cost is of cost
When cost is of cost
✔️
If there is a number after T7PlaySpqcey (Example: T7PlaySpqcey10 or T7PlaySpqcey100), then use this table:
T7PlaySpqceyX
When cost is of cost
When cost is of cost
When X times cheaper than cost
When cost is of cost
When cost is of cost
When cost is of cost
✔️
While the “X” is only directly in the buying condition, because the buying condition is based on the cost of , the “X” also indirectly affects how much is bought.
Regardless of the “X” value, the buying condition remains “When cost is of cost”
The number after T7PlaySpqcey occurs more at lower values.
If you are confused about the “%”, read about it here.
Strategy Credits:
Playspout for , , , buying strategy
spqcey for the addition of
Snaeky for number after T7PlaySpqcey for if and are bought, and if so, what ratio
The milestone state will be described with four numbers. These describe the priority of the milestone. For example, 4→3→1→2 means you should prioritize buying fourth milestone levels first, then after the fourth milestone is maxed, then you buy third milestone levels, and then first milestone, then second milestone.
There are 3 milestone states:
State 1: 4→3→1→2 (prioritizes boost for the term)
State 2: 2→1→4→3 (prioritizes boost for )
State 3: 1→2→4→3 (prioritizes boost for instantaneous gain, aka exponent)
This strategy swaps milestones depending on how far away the next or upgrade is.
The goal of this strategy is:
Buy /
Swap milestones into State 1 to fully utilize the boost from the new / upgrade.
After some time (the exact amount of time will be described later in the strategy), we want to swap to State 2. This way we boost so we get more quicker.
When we are closer to the next / upgrade, swap to State 3 so we utilize the boost that we just got for . This will get us to the next / upgrade a lot quicker.
Repeat.
This may seem difficult to execute, but publications in SL are 1 to 1.5 hours long after e50-e300. This means there can be up to 5-10 minute gaps between / upgrades later in the publication. You will also get used to the swapping ratios and duration quickly because of the consistent publication lengths. At the very end of publications, you will also not have to milestone swap, as we will use State 3 only, to get the last boost before publishing.
As long as < e175, we will swap between the three states, after that its just the first two states.
Note: NEVER swap into State 2 after 4.5 publication multiplier. Do State 3 instead for that time.
The ratios for swapping are as follows, where you enter the next state when the ratio: is lower than the ratio provided under the header:
Ratios for SLMS Swapping
State 1
State 2
State 3
Until 5x
Until 4x
Until upgrade is bought
Until 7x
Until 6x
Until upgrade is bought
Until 12x
Until 10x
Until upgrade is bought
Until 20x
Until 15x
Until upgrade is bought
Until 8x
Until 6x
Until upgrade is bought
Until 1.5x
Until upgrade is bought
Skip
Until 3x
Skip
Until upgrade is bought
Until 2x
Skip
Until upgrade is bought
cost in the table refers to cost.
This may seem confusing, but let’s take the first row as an example.
In the first phase,, you should have your milestones in State 1 until is of min( cost, cost).
Then, swap to State 2 until is 1/4 of min( cost, cost).
After that, swap to State 3 until you get the upgrade.
Note: You do not have to follow those ratios exactly. It does not make much difference if you do it slightly differently.
The numbers are just important to give the idea for around where you want to swap.
e.g. in e200+ range, you only want to swap when close to next /. and e75-e150 you swap very early.
These numbers also tell you that you never want to be in State 2 for a long time.
* If you can afford the next lvl% before the next or lvl, then autobuy .
** If and have similar costs, prioritize .
*** If and have similar costs, prioritize .
Milestone swapping strategy (e700+)
After you unlock the milestone, you can perform milestone swapping until . Alternate between having the milestone on and off. When , keep the milestone on everytime. Milestone swapping is no longer required once you can reach quickly.
For more information about the FP milestone swapping strategy, check here.
Strategy Credits:
Hotab for implementing this strategy into the sim and adjusting it
After you unlock the milestone, you can perform milestone swapping until . Alternate between having the milestone on and off. When , keep the milestone on everytime. Milestone swapping is no longer required once you can reach quickly.
For more information about the FP milestone swapping strategy, check here.
When the theory simulator recommends this strategy, it will show something like: RZdBH=388.85 : 3091 : 773.
The value after is the value at which the black hole should be set. We recommend putting the threshold 0.01 above this value to avoid precision issues.
The levels it shows after and are the last levels you should buy them to in this publication.
Strategy credits:
Hotab, Blackseal, Mathis S. for the implementation in the sim
Hotab, Blackseal, LE★Baldy for the running simulations to set up the list of good zeros the final sim uses
To perform SpiralSwap, switch milestones to prioritize exponent when is close to zero (when the graph is close to the origin) and to prioritize when .
This strategy is extremely active. Using RZdMS is much easier and doesn’t lose that much time compared to RZSpiralSwap.
When the theory simulator recommends this strategy, it will show something like: RZSpiralSwap: 953 : 238.
The levels it shows after and are the last levels you should buy them to in this publication.
Strategy credits:
prop for the milestone swapping and variable buying strategy
If cumulative cost to lvl% is x cheapest other purchase, buy until lvl%. When saving for lvl%, ✔️. Otherwise, buy at lvl% ratio to other variables.
✔️
✔️
✔️
✔️
✔️
✔️
✔️
✔️
✔️
✔️
Start coasting when x25 away from the next publication mark or next milestone.