Will output optimal graduation mark based on current students, phi, and tau values. Instructions on how to run are found in Introduction to Graduation.
Leaderboards for highest τ and publication multi of each theory, highest positive and negative ρ of each lemma, highest overall and minigame stars, and a monthly updated cross platform F(t) rankings.
Get confused with all the variables in T1-T8, MF, BaP, FP, and TC? Get tired in calculating the ratio of to other variables? Tired of checking the sim for purchasing variable? Here introduce a convenient tool to instantly check which variables to buy next! All u need is the levels of the variables at the current stage, and it will calculate automatically for u! Made by Hackzzzzzz.
Get lost which theory you should push next for T1-8 and the CTs? Use the Next Theory to Push Calculator to help you decide. Originally made by d4Nf6Bg5.
Centralized sheet with all currently finished and in-development Custom Theories. All future official Custom Theories will be on this sheet before they become official. Message @a_spiralist or @jooo_1265 on the Exponential Idle Discord for updating, fixing, and general sheet editing.
If you want to track your daily tau gains and contribute to daily tau rates graphs, request for access on this sheet. F(t) and Tau graphs available.
You will not touch this theory until after ee14k. Once you begin pushing T1 after ee14k, begin using the Theory Sim and the Theory Sim Guide to give the best strategy and multiplier for the next publication.
This theory will be used as overnight until 1e350 where it will not be touched until after ee14k. See our earlier guide for an overview for theory 2.
The optimal publish multiplier for T5 is between 2-3 and 6-10, please check with The Sim for accuracy. Theory 5 is based on logistic function. This theory is slow early, but becomes very powerful later on in the game. It is recommended to keep pushing this theory as high as possible before reaching ee14k ft. Make sure to carefully read the behavior of c1 and c2 variables in this theory, as the behaviors are quite unique.
The first line states that the rate of change of is the product of some . Note that and are variables that you can buy directly, while is a separate variable that is based off something else.
The second line defines this theory. It describes the behavior of a typical logistic function. A logistic function typically has slow growth at the beginning, then fast growth in the middle, then it flattens out at the end. Here we have , which speeds up the rate at which we reach the maximum value of . Note it DOES NOT increase the actual maximum value of itself. We also have . This increases the maximum value of . However, it HALVES the speed at which this maximum value is reached. Therefore we must be careful to not buy too many at once.
is similar to in which buying it increases the maximum value of . However it does not have the drawback that has. So we can buy this unconditionally.
The maximum value of is . Once reaches this maximum value, dot will be zero and will not grow anymore until we buy either more .
Approximate variable strengths on with all milestones are as follows:
Brief summary of variable strengths of Theory 5.
Variable Description
~7% increase on on average (instantaneous).
Doubles (instantaneous).
reduces time to maximum value of . Note that it DOES NOT increase the maximum value of itself. If is close to maximum value already, there is no point in buying .
Doubles the maximum value of , however, it also HALVES . Be careful to not buy too much as this can cause to be too low. Do not ignore as, otherwise, the maximum value of will never increase.
Think of buying as throttling on the bicycle faster. Buying is similar to shifting the bicycle gear up by 1 gear.
If all one does is buy and never , then they are stuck in gear 1 forever and make no progress. However, if all one does is buy and never , then this is similar to trying to ride from highest gear from 0 speed, which takes a long time and a lot of effort.
Therefore using the bicycle analogy, buy only when , speed, is enough to support it; not too early and not too late. Furthermore, later in the publication, buy only 1 level of at a time. Buy only right after buying (shifting up gear).
When deciding when to buy , think of as throttling a bicycle, and as shifting up gear by 1 level.
For step 2 of the semi-idle and active strategies below, you should be manually buying . If you’re over , start with buying 10x variables at a time. Otherwise buy 1 level of at a time.
You want to buy until the value of increases slowly. The pattern should be:
Buy . should increase.
Once increases slowly (or stops increasing), buy more .
If you buy a and the value of is increasing even slower than before, this means you bought too many levels of . Wait for to stabilize and then continue buying
Once you’ve reached within of the previous publication point, you can safely autobuy for the rest of the publication. Remember to untick autobuy at the end of the publication when you click publish!
Here’s a simple yet effective active strategy that can be used right until endgame. To find more optimized strategies, please see the List of theory strategies.
For each publication: autobuy and . Buy ONLY right after buying from steps 2 onwards. Practically, everytime level of is bought from steps 2 onwards, ~5-6 levels of would be bought.
Note that for faster speed, during the first part of step 2, 10 levels can be bought at a time.
For the first 10 seconds, autobuy everything except .
Then we autobuy . Out of these 3 variables, find the one with the cheapest cost. Then buy until its cost exceeds 15% of the cheapest variable found above. Buy ONLY right after buying a level of .
Once the theory has recovered to its previous publication mark, slowly put less emphasis on . When in doubt, have 's cost be similar to 's cost. Continue doing step 2 until publish.
All milestones into the 2nd milestone to unlock . Then into 1st milestone because variable is higher value than variable, finally put the rest into the last milestones. This theory does not have a known effective milestone swapping strategy.
0/1/0
→
3/1/0
→
3/1/2
Commentary
(By Snaeky)
Theory 5 Active Strategy Video Example and Commentary By Snaeky
No commentary
(By Snaeky)
Theory 5 Active Strategy Video Example By Snaeky
(By Playspout)
Theory 5 Active Strategy Video Example By Playspout
T5 will always give its best results from active play. However, after step 3, you can still get good results while autobuying and manually purchasing every 10-15min. This makes the theory slightly less active and easier to deal with.
Warning: Do not overnight this theory. It has terrible decay after passing a good publication mark and will not give good results. T5i is only viable very late/endgame.
T6 has the lowest decay of all the theories. It will be second place to T5 until ~ and is the only theory that can get to . You should overnight this and T4 after you get your T2 to .
At first, T6 only finds the area under the curve of the graph from to , which is essentially a 2d plane. This is done using a definite integral, an integral that is bound between 2 values giving a single output. This does the opposite of what a derivative does, but within a specific bound. With later milestones, this will include the variable , this new equation is finding the volume of the graph within the bounds of planes and from to and to respectively.
is equal to the sum of all instantaneous changes in , or equivalently instantaneous increases to the integral, caused by buying upgrades*. When a upgrade is purchased, the value of the integral increases by a respective amount.
For example, let the integral equal 10, and you buy an upgrade that costs . should decrease to . If the integral increases to 20, then to for , integral.
acts as the mechanism which decreases the correct amount after a purchase. If did not counter-balance, then would diverge as every upgrade would increase instead of decrease (also the reason it is and not ).
* This is not the same as the sum of the cost of all upgrades as not every upgrade increases the integral by the same amount, i.e. an upgrade costing will not increase the integral by , but more or less.
The optimal multiplier varies between 6-12, but spikes depending on what variable is dominant at the time and how close you are to a milestone. For an accurate multiplier, check with the sim.
T6 Strategy
Idle
Buy All.
Turn off and when you unlock .
Turn off , , and when you unlock .
Turn off and .
Turn off and .
Active
Buy All with bought at of cost.
Buy when of cost. Stop buying and when you unlock .
Buy and , past , when of and costs respectively. Stop buying , , and when you unlock .
Buy and , past , when of and costs respectively. Turn off , , and .
Buy and , past , when of and costs respectively. Turn off and .
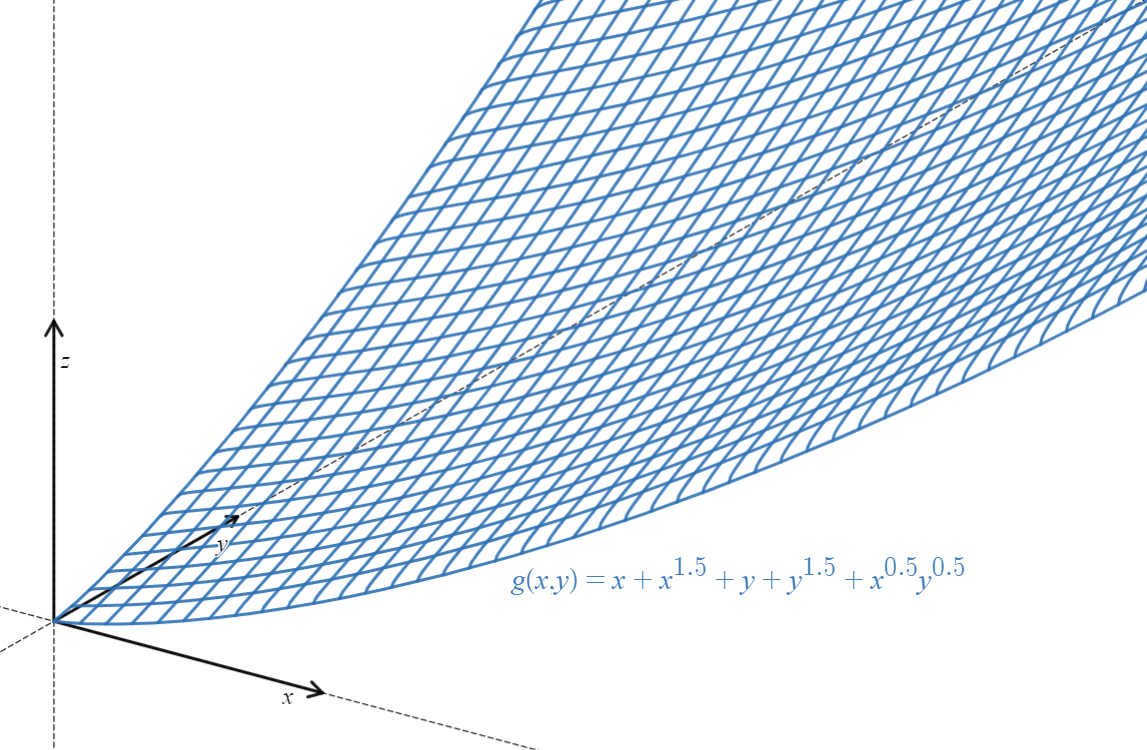
T7 can be summarized as a maximization problem : given a surface in 3-dimensional space, you want to find its highest altitude by moving along the surface, always in the direction of steepest ascent (that’s basically a gradient ascent). The function can be seen as a surface in (considering the set of points , see attached image). is a point on this surface. Our goal is to maximize , i.e. to find that maximize . Notice that the function is unbounded, i.e. you can’t find a proper maximum (we say that the maximization problem is ill-conditioned); so one way to maximize is to move towards the direction of steepest ascent. This is what is precisely done by setting (which is the direction the point will move toward) to (i.e. the gradient of evaluated at , which gives the direction of steepest ascent of at the point .
This is the graph of the function , taken after the first four milestones have been unlocked.
Note: here, coefficients like are ignored. The effect of those coefficients is simply making the graph steeper in or direction, depending on the value of each coef.
The optimal publication multiplier is -. You will swap from 0/1/1 → 0/0/2 near . The strategy for manual buy before 4 milestones is to only manual buy and cheap ( less ) and the rest full auto. After milestone 5, turn it on full autobuy for idle. For active, follow the strat described in the theory sim guide or watch the video below.
Theory 7 Active Strategy Video Example and Commentary By Snaeky
Temporarily skipping T8 is significantly faster than buying T8 right away because of how slow T8 is from (don’t worry, you will still buy it, just at , not ). T8 is very slow until you get to ~ (it took the sim 16 hours to get that far into the theory without R9). We highly recommend buying T8 for the achievement, then selling it right away to use those students for . You will need ~ in order to get R9 () without T8, which will help you get through T8 faster than before. You will need to buy T8 again to get R9, and you should start R9 right away after that The current recommendation for your distribution for T8 skip is as follows:
T8 skip recommendations
Idle
Active
T1
T2
T3
T4
T5
T6
T7
T8
Skip
Skip
If your numbers are different, that is fine. You just need to reach to get to R9 at .
All routing follows the student calculator (by Niedzielan, AfuroZamurai, and Milla) and star calculator (by Eaux Tacous#1021). When you are not pushing you should always have the 9th research option maxed (after Theory 8). When pushing , you should be R9 swapping (below).
There is also the theory simulator originally by XLII and now developed by the Exponential Developers, which works both below max milestones and after max milestones for all theories.
Memorize your student distributions with and without 10/20/30 R9 students. Use the student calculator if needed. You will commonly see people refer to this as R9 swapping as a long held name of the strategy.
Wait till stops growing with students in R9 pushing .
Start accel (preferably keep it between prestiges).
Potentially sit here to stack t for bigger when you have students in . Only do this when you are near a graduation mark. This is not useful if you will not swap into .
Respec all 10/20/30 students from R9.
Wait for the autoprestige to prestige and swap back students to R9.
Repeat.
This method allows you to push with almost no loss of R9 uptime or pushing power. This is harder with fewer levels of R9 but still helps if you get used to it.
You can find the autoprestige used for R9 Swapping here: Equation. If you don’t have this expression, then you will have to manually prestige each swap.
The optimal publication multiplier is 2.5-5 depending on how close you are to the next milestone. This theory is extremely slow at the start which is why we skip until we obtain R9. It is also the only one with a milestone step. It will speed up once you hit and even faster at and etc. until ~-. The worst part is the - grind. The grind to will take a good bit of time but is faster with R9.
At the start, manual buy prioritizes then then rest. Once you get to 0/0/0/2, prioritize and then then the rest. Once at 2/0/3/0, you will prioritize and then then the rest after. This continues to max at 2/3/3/3.
In general, you will need ~ in order to get to 20k easily. Make sure that you are R9 Swapping and holding accel when you can. Recommended values for your theories is as follows. Being above or below these values is fine, just as long as you have ~.
k recommendations
Idle
Active
T1
T2
T3
T4
T5
T6
T7
T8
Being above or below these values is fine, just as long as you have ~.